The simplest way to explain what Enfocus Switch does...
(Warning - if you’re a geek, you’re better off skipping this paragraph or the simplicity will probably make you cry a little.)
The simplest way to describe Switch is to say it’s a collection of folders. And each folder has an action associated with it. So every time a file gets put into a folder, an action is carried out on that file. For example, there may be a folder called ‘check page size’ and if a file is dropped into that folder, its size is checked by comparing the artwork against the job. If it passes, it’s automatically moved into the next folder and so on, until it reaches its intended destination e.g. the prepress workflow. But if it fails the criteria checks, it will be placed into a holding area and flagged for the attention of an operator. That’s why Switch workflows look like this…
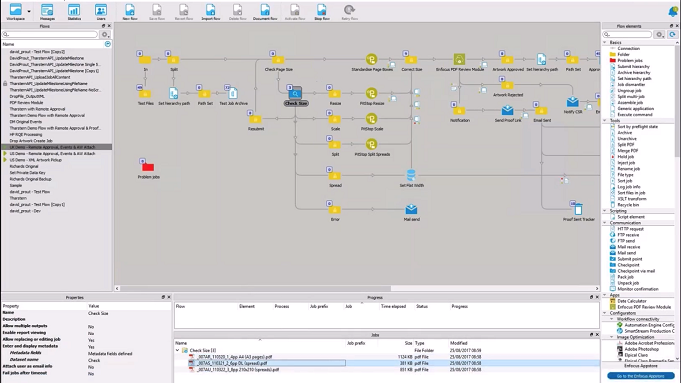
You can see the folders that the files get dropped into, and you can see how they flow from one folder to the next, from left to right, until they get to the prepress workflow at the end. At the bottom, where you can see 3 files, that’s the holding area where failed files are stored, waiting for an operator to fix.
Wait! You still need an operator? Didn’t you say it was automated?
Only if there’s an error. The benefit you get from Switch is that you don’t have to check every file – only fix the ones that have errors. And actually, you don’t always need an operator - you can create automated rules for some of the simpler errors, but more on that later.
What should I be automating?
In Tharstern’s words, Switch is a ‘lights out’ toolbox, meaning that it’s a collection of different tools that you can use to automate actions within your production workflow. It’s not a one size fits all solution though (hence the use of the word ‘toolbox’); it’s something that you can use as a tool to automate mundane and routine tasks. Exactly what tasks get automated will be down to you and your team to decide though. Yes, you can hire external help to create the workflows in Switch, but you’ll still have to tell them what to automate. But while we can’t tell you exactly what workflows would be most beneficial for your company, we can give you a few great examples to inspire you.
1. Automated Preflighting
Preflighting is a fundamental part of all modern prepress and digital workflows but it’s often overlooked and misunderstood. In one of my previous roles in the industry, I always winced when I caught sight of preflight warnings on screen and yet was told by the operator that everything was fine. I winced because I knew how detrimental those errors could be. If you’re looking to have any success with automation, preflight warnings are NOT your friend - it’s vitally important that artwork files pass checks for printability.
Doesn’t my prepress software carry out preflighting checks?
Indeed it does! All the major prepress workflows have their own preflighting engine and will check around 6-10 different things to assess the printability of the file, including:
- Trapping and overprint issues
- Image resolution
- Color space
- Font issues
- Flattening layers
- Versions
Why bother with Switch then?
The biggest difference is that Switch has a database module, so it can compare the PDF with the original estimate created in your MIS, presenting you with lots more preflighting opportunities. It's also done up front, before the job gets into the workflow, which means there's a chance to recover costs if the artwork doesn't match the job.
Let me take you through a few examples. All of these jobs would fail preflighting:
- A brochure supplied in double page spreads.
- A 6pp DL leaflet supplied as a 2pp A4.
- A 4pp A4 flyer supplied with A3 artwork.
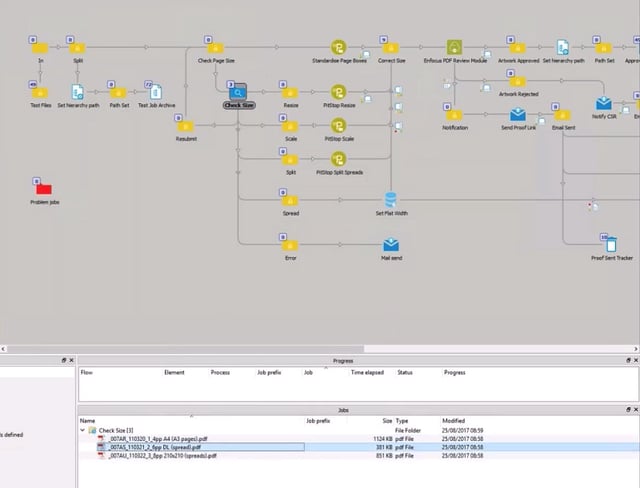
In this example, you can see that the ‘Check Size’ folder has 3 items held within it. That’s because all 3 files have failed this particular preflighting check. The items are listed in the holding area at the bottom of the screen, and an operator is alerted, allowing them to look at the file and edit or correct it before submitting back into the flow for further processing.
Fixing the errors is a pretty simple process and Switch have designed it so that non-prepress people like your CSRs can handle it. Switch presents you with a number of pre-set options to fix the issues including: Split, Spread, Scale, Resubmit, Error and Resize. This is how we fixed the artwork in our above examples:
- For the brochure supplied in double page spreads, we selected ‘Split’. This splits the relevant pages in half and adds the missing printer marks. In this case we’re actually editing the customer’s PDF file.
- For the 6pp DL supplied as a 2pp A4, we selected ‘Spread’. This modifies the Tharstern job to match the artwork.
- For the 4pp A4 flyer with A3 artwork, we selected ‘Scale’. This simply scales the artwork down to A4 to match the size specified in the job.
Other options available:
- Resubmit – You can manually amend or replace the artwork and resubmit to Switch.
- Error – Allows you to contact customer via email and clarify.
- Resize – Modify the trim values to match the size in Tharstern.
The benefits of preflighting using Switch
The biggest benefit is a time-saving one - files that pass the quality control steps are moved directly to production, so that the operator doesn’t need to spend any time checking them. But you’ll also benefit in other ways. If you send incorrect artwork to prepress then you’re wasting valuable production time. And not only does it make you inefficient and look bad in front of the customer, it also removes the opportunity to charge for any extra costs incurred from fixing the artwork. That’s why the database functionality of Switch is so beneficial - it allows you to make good preflighting decisions early on and without always having to amend the customer’s file.
Automating preflighting decisions
You don’t always need an operator to fix preflighting errors. You can automate some decisions by creating rules. Here’s a couple of examples:
1. If a 2PP document is 3 times the width of the original 6PP file, then auto-select the ‘spread’ option to modify the Tharstern job to match the artwork
2. If a 4PP document is only 3 pages and the second page is twice as wide as the other two, then auto-select the ‘split’ option.
You could even have a rule for specific customers who always supply files in a slightly odd way!
Workflow

2. Remote approval
The PDF Review Module was only released in (2017) and we think it’s fantastic! It’s a simple but powerful tool that delivers a solution to a very common problem.
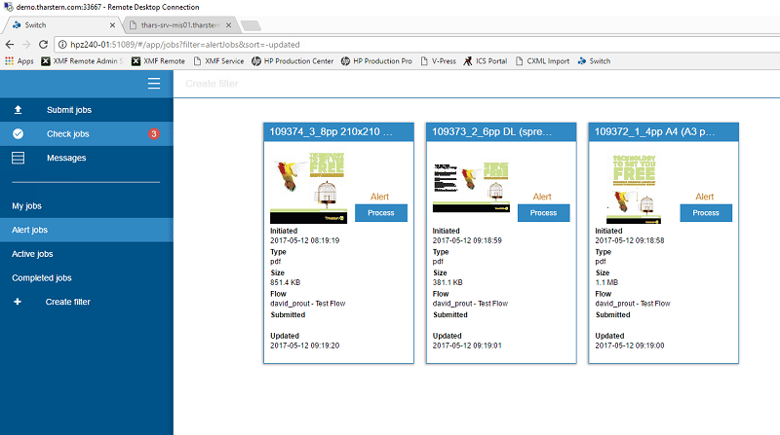
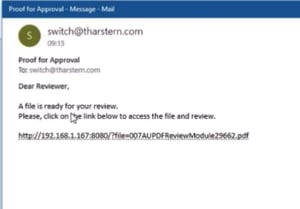
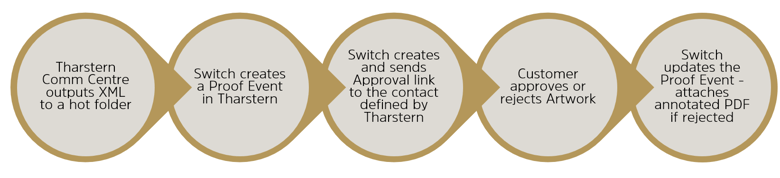
To give a really good customer experience, you need to make the remote approval process as smooth as possible, with the minimum amount of IT fuss. So imagine being able to remove the need for registering, java plugins, login details and forgotten passwords. That’s what the PDF Review Module gives you – it works by generating a unique URL which is sent via email to the end user. The PDF is streamed and when artwork files are approved, the URL stops working. All your customer needs is a web browser and an email address.
Lots of companies have hundreds, even thousands, of customers that they only do one job a year for, and it actually ends up taking longer to set up them up on a remote approval portal than it does to get the proofs approved manually. The Switch PDF Review Module changes all this.
On top of all that, because of the open and unique way that Switch works, we can fully embed the approval process into Tharstern, which is why everyone here is so excited about it.
To the side is what the approval request looks like and this is totally customizable. And below is what the customer will be presented with when clicking the link.
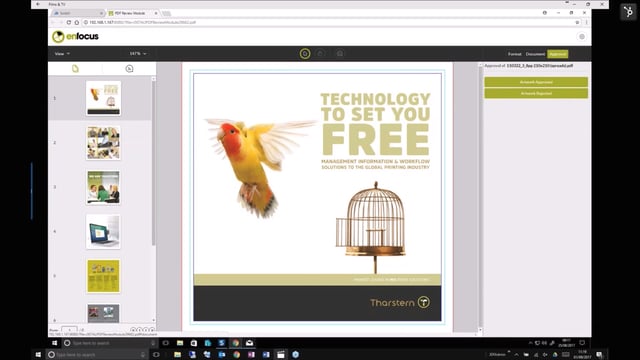
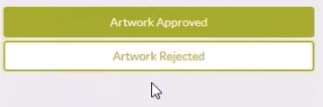
They have the option to approve the artwork or reject it. If they reject it, they can add comments to explain what needs to change.

If you want to approve on the customer’s behalf for whatever reason (it happens!), we can launch the remote approval link from within Tharstern and approve on our customer’s behalf.
Once approved, the files are sent to the press via JDF.
The MIS also records the approval milestones e.g. ‘artwork approved’, ‘artwork rejected’ or ‘new approval link sent’, along with a link to any annotated PDFs so you can keep a record of all your proofing cycles for each job, from its creation to its submission to digital device/plates. Very handy if a customer comments on a delay in delivery that isn’t your fault, and also as a means to analyze the amount of time you’re spending on proofing cycles.
What it does NOT do
- No management of login, passwords or user permissions
- No real-time collaboration
- No PDF downloads
- No printing of the PDF
Workflow
Adoption of Remote approval amongst Tharstern customers
At a recent webinar on this topic, we asked attendees about their use of remote approval and they gave the following answers:
- 65% of Tharstern Desktop customers use remote approval currently
- 69% thought that more than 25% of their customers would use remote approval and 21% weren’t sure
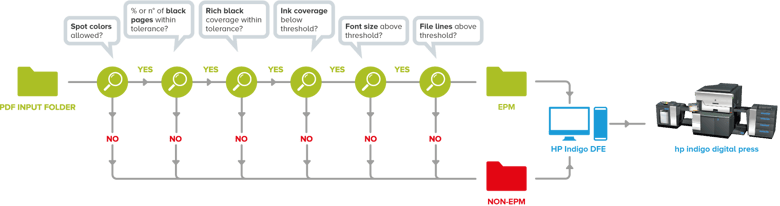
3. HP EPM Mode analysis
EPM is a mode on the Indigo 7000 and above series where you can print black using Cyan, Yellow and Magenta. Not only does this increase production speed, but it also reduces the number of click charges. It isn’t suitable for all jobs or even every customer and each job has to be checked for suitability. But doing this manually erodes any cost savings that could be achieved.
That’s where Switch comes in; it automatically preflights print-ready PDF files and routes them to EPM and non-EPM specific workflows, based on a set of rules.
Workflow
- Switch analyzes the artwork
- If suitable for EPM, the Estimate and Job are updated in Tharstern
- Tharstern submits the Job to the DFE with the appropriate HP ticket template
4. Order processing
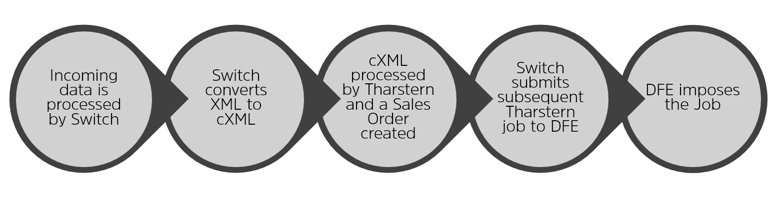
You can also use Switch to process high-volume, low-value print jobs where any manual intervention destroys the margins. Switch can take multiple data files from different storefronts and auto-process them ready for production.
Workflow
Conclusion
These are just a few examples that we came up with in a laboratory environment, so they’re only hypothetical and not relevant to everyone. But we highly recommend taking the time to think about how Switch could work for you. Hopefully, this article has given you an idea of the types of things that you could automate and inspired you to innovate with your own workflows and rules. You only need 2 things to succeed with Switch:
1. A vision of what you want to achieve
2. The technical resource to deliver it - either in-house or by using a third-party provider like Tharstern.
The key criteria for tasks you should consider for automation are:
- They’re repeated regularly and never change OR
- The tasks change based on certain criteria, but these fit an ‘IF-THEN’ formula e.g. ‘IF a 6pp DL job is supplied with 1PP A4 artwork, THEN convert to a spread in Tharstern’.
My advice is to start with just one easy task. Experience has shown that once a customer has finished the initial deployment of that original task, they have a better understanding of what other tasks they could automate, and their use of Switch grows organically from there.
If you’re still unsure and want further advice, we’d be happy to chat with you and share our experiences with Switch and what others have achieved. Get in touch with our experts here.
Share this

5 challenges label converters face that MIS software could solve

Customer Relationship Management – 5 good reasons to use a CRM